Showing posts with label bird. Show all posts

Wednesday, September 9, 2026

Stampfest at Lynette's September 7, 2026

Don and I enjoyed Labor Day at Lynette's place. We always have such a good time together. The weather was perfect...with a cool breeze coming through the open windows. 

Lynette and I had a bunch of fun techniques to try. Our first project was inspired by a collage-y card made by a member of  the Facebook group, "Come crafting with Natasha"...as in Natasha Foote.

You can click on any image and a larger version will appear.

We created a background using Stampin Up! celery ink with a sequin waste stencil (circles), Distress Abandoned Coral ink with a stencil from Lynette's stash and Distress Squeezed Lemonade.
Then we stamped images in Versafine Onyx Black ink using:
BoBunny Mixed Media stamp #2604841: circles and perpendicular lines
Stampin' Up! Avant Garden: twig
and an unknown butterfly stamp.

The flowers were made by dry embossing white cardstock with the Cuttlebug Textile embossing folder.
Then Lynette die cut the flowers with a Sizzix Tim Holtz Big Flower Tattered Florals thick die. 
The center circles were cut from rose cardstock using two punches: 3/4 inch and a 1/4 inch.

Our Bird with Tickets cards were  inspired by a Zoey Scarpelli card seen on the Stampers Anonymous Instagram.  We stamped Hero Arts H2141 Manuscript Backgroundscript background stamp twice to fill the panel using Distress Hickory Smoke ink.
We ink blended with Distress Vintage Photo ink and the sequin waste circle stencil at the top left and bottom right of the panel. We also ink blended the background panel with Distress Vintage photo, Spiced Marmalade, Wild Honey and Gina K's Blue Denim.

Lynette used a Stampers Anonymous bird stamp, inked with Hero Arts Brilliance Mediterranian Blue ink. Then to get the design on her bird, She used a clear Hero Arts background stamp on the table and pressed her inked bird to it, creating the design...a technique known as "kissing". 

Tickets were made with clear stamps of unknown manufacturer.
The small heart is an old Stampin' Up!wood mounted stamp from 1994.

Our Butterfly card was inspired by Des Papillons by Gervaise found on Pinterest and also on Canalblog/Scrap Photos
https://gervaisescrap.canalblog.com/albums/cartes_14/photos/114512694-sam__3_.html?utm_source=Pinterest&utm_medium=organic

Lynette developed a technique for our background by...
swiping an inkpad on a craft sheet, 
spritzing it with water 
then dipping a scrunched strip of bubble wrap in it 
and tapping it on a layer of watercolor paper.
We ended up liking SU Tempting Turquoise and Green Galore inks. If you look closely you will see the Distress Broken China, which has a more muted tone-a more gray blue color.

Used Versafine Onyx Black for the stamping:
Compass from Tim Holtz Mini Blueprints Strip Travel Cling Rubber Stamps thmb008
Hummingbird from Stampin' Up! Bloomin' Marvelous
Tiny script wood stamp from Stampa Rosa@TinCanMail, 2000
BoBunny mixed media-3 circles
and Bo Bunny Airmail Stamps-the number 23.

We also made five additional watercolor panels, 3 x 4-1/2 inch size which will be very handy for making other cards.


Our next project was about creating a watercolor look with stamping. We referred to
https://www.youtube.com/watch?v=kYlVmbDbod0&t=219s

Beth also has a blogpost for this, Avant Garden ~ A card all about Sale-a-Bration
https://bethrush-bethspapercuts.blogspot.com/2017/01/avant-garden-card-all-about-sale-bration.html

Beth stamped on SU shimmery white cardstock saying it would hold up to watercoloring better than plain cardstock. We did not have the SU shimmery white cardstock, so we used watercolor paper. 

For our first try, we stamped  the flowers on dry watercolor paper, let it dry, then used a waterbrush to "paint" over the color hoping the color would spread a bit. We did not get much activity with the waterbrush.

Above is our second try. First we spritzed the watercolor paper with water, then stamped the images. As you can see, we have more movement of water. I'm not sure I like this better.  As I worked on this blogpost, I found that Jackie Bolhuis created thisYouTube, Simple Stamping Techniques--Watercolor Look  in Jan 15, 2013. I would like to try that. 

However, her success may relate to using a water based marker pen (She used Stampin' Up! markers) instead of an inkpad. I really like the softer look as the water moves the color on her panel.


Here we are in Lynette's stamping room.

Thank you for visiting!
Peace and all good!

Saturday, January 18, 2025

Stampfest at Lynette's January 17, 2025

Don and I visited Lynette Friday, January 17, 2025. We walked to Sugar Bowl restaurant, enjoying the sunshine and warmer weather. Two of us had the delicious Hobo breakfast skillet and one had a big hamburger meal with fries. Plenty to eat and lots of leftovers to bring home.

Lynette found a great card idea created by Ceal Pritchett for My Sweet Petunia. Lynette used her Waffle Flower Postage Collage Die to make two postage layers. We then cut the individual "stamps" by using scissors to cut on the perforation lines. Voilá 6 stamps for each of us. We decided we could each make two cards.


Stamps: Stampin' Up! - Nature Walk, Botanicals, French script and postage cancellation
Unity - a butterfly collage stamp, and stamps from her stash
Inks: Gina K warm cocoa for the script, Versafine onyx black
Colored pencils

We had so much fun making flowers on watercolor paper at our May 7, 2024 Stampfest that we 
re-visited Amy William's technique Water Coloring Made Easy! This time, we used Lynette's watercolors from her stash. She had made a palette of dried tube watercolors on a plastic covered tray with round "wells". It worked great with a waterbrush...and we used an old rag to absorb extra water from the brush when needed.

Lynette's four panels are first. Then the next image of five panels is mine. 

We were inspired by some Pinterest pins to add more to the stems this time...extra lines and dots and lots of little leaves. We plan to add the panels to a card base.

Thanks so much for visiting!
Peace and all good!!

Monday, October 7, 2024

Stampfest at Lynette's October 2, 2024

On Wednesday, October 2, Don and I visited Lynette. We had a great time having lunch together at Buona Beef, stamping and later visiting and relaxing!

Here's another view of our cards.

Lynette wanted to try a stencil technique that I have used to make sympathy cards. We used the Lattice section of the Tim Holtz Stencil called Flourish And Latticework Thmm115 and Stampin' Up's cameo coral ink with a blending brush.  We stamped Gina K's long flower from the Lisa Hetrick designed Hugs & Wildflowers stamp set using SU's lucky limeade and cameo coral inks. The card base is a  heavy weight creamy white cardstock from Hobby Lobby.


When Lynette showed me the butterfly and stenciled cards she made based on Natasha Foote's YouTube A 'Must Know' For Crafters!!! The Classic Split #1040 I wanted to make it too! So Lynette cut the butterflies with dies from Crafters Companion and I added stenciling and ink blending to the card using the Flourishes portion of the Tim Holtz Stencil Thmm115 with distress broken china and SU gable green inks. Also used a piece of waste canvas as a stencil. Lynette's work was the hard part, getting all those pieces removed from the die! 

We were both interested in making the Scribbly Bird cards posted on Anneke De Clerck's blog, Some Fiddling on the Kitchen Table. Below are 2 of Lynette's birdie layers, then 2 of mine:


We used Lynette's Caran D'ache watercolor crayons and a water brush on cold press watercolor paper--the smooth side. Used a heat tool to help dry the panel before stamping with Versafine onyx black ink and Dina Wakley's Scribbly bird stamps. We also stamped a separate bird image for layering as shown by Anneke, leaving the legs and feet of the image on the panel showing. We used a zig permanent pigment ink marker to hand draw leaves and circles and lines and a pink marker for groups of dashes, as Annke showed.  It was so relaxing to make these layers!

We also stamped some floral designed panels, using Gina K's Hugs & Wildflowers stamps designed by Lisa Hetrick. We duplicated the panels we made on our March 27, 2023 Stampfest. However we used Stampin' Up inks: lovely lilac ink for the flowers and old olive for the stems and leaves. We used an embossing stylus after inking the leaves to create the "line" in the center of each leaf.

After we finished stamping, Lynette served us an assortment of crackers with a Double Gloucester cheese with onion and chive, tortilla chips and salsa, a pumpkin spice caramel cluster candy, and Motif Cabernet Sauvignon Red Hills Lake County wine from Trader Joe's. We enjoyed watching some old music videos on YouTube on the TV. It was great fun visitng, stamping and relaxing!

Thank you for visiting!
Peace and all good!

Wednesday, August 21, 2024

Stampfest at Lynette's August 15, 2024

Don and I went to visit Lynette on Thursday, August 15, 2024. We enjoyed lunch at the Sugar Bowl restaurant...each of us ordered the Hobo Skillet. It was delicious! We all took home leftovers! 

After we were done stamping, Lynette served us her wonderful Seafood Salad, plus chips and salsa and Brie cheese and crackers and some Espiral Vinho Verde!

For our Stampfest inspiration, Lynette found an uncredited pin on Pinterest displaying a  sweet bird card made with one of Dina Wakley's Scribbly birds. I brought that set. Also brought Gina K's  Mandala stamp set and the Stampin' Up! Artistically Inked set-recently gifted to me by my dear friend, Mona.

Lynette made these Mandalas using Gina K's inks: Grass Green, Ocean Mist, Turquoise Sea, and Blue Raspberry. We followed Jennifer McGuire's Kaleidoscope Card YouTube.  

We both worked on these fun bird cards!  I stamped the Dina Wakley Scribbly bird twice on old music paper with Versafine Onyx Black ink. Lynette fussy cut them. 

We stamped the white card base with a stamp called Woven Linen by All Night Media #408K using SU's bordering blue ink. Then I added various Gina K ink colors with blending brushes to the card base: Powder Blue, Turquoise Sea, Wild Dandelion and Kraft.

We tore a strip of old book paper as shown and used Gina K Kraft ink on the edges. We made the ruler strip with an embossing folder, trimming to fit. Lynette punched the hearts from red cardstock. We used a Stampendous clear set #SSC039 Window Box for the happy birthday sentiment. We stamped it in Versafine Onyx Black ink.  

With the Stampin' Up! Artistically Inked stamp set, we followed Jackie Bolhuis' YouTube tutorial.  Thanks to Mona for the stamps and for sharing Jackie's One Card Wonder tutorial. This technique makes it so easy to create 4 card fronts at once using 8-1/2" by 11" cardstock. I had already tried this technique when I received these stamps from Mona. If you want to see my samples go to my Artistically Inked cards here. 

As usual, we had a great day visiting and stamping! 

Thank you for visiting!
Peace and all good!

Saturday, March 23, 2024

Stampfest at Lynette's March 22, 2024

Lynette and I had a great time visiting and stamping on Friday, March 22, 2024. I finally remembered to have Don take a photo of us. 

We found plenty of inspiration online. This time we decided to try inkblending within a circle "mask" and a birdhouse card. 

This is Lynette's card. We were inspired by Gina K's YouTube tutorial,
...except I forgot to bring my masking magic to do the strips like Gina did. We decided to just blend the colors together. 

We cut out a circle mask with cardstock and taped it down carefully putting the tape on my sleeve first to make it less sticky for easy removal. 

The blue is on the bottom to kind of resemble the ocean/water as Gina did in the striped circle she created...see 52:30 on the video for the stripes.

Here is my card. I'm wondering if I used a different cardstock which made it easier to get darker colors. I used the same ink blending brushes and ink that Lynette used. We started with the orange and worked our way toward the blue like Gina did in the first part of that YouTube video.
We used the same Gina K ink colors shown in the first part of the video: 
Sweet Mango
Passionate Pink
Wild Lilac
Tranquil Teal
Then Blue Denim over the arc of the edge of the circle mask.

Images stamped with Versafine onyx black. The palm tree stamp is from Lynette's stash. The birds are from a Tim Holtz set.

Our birdhouse card was inspired by Leonie Schroeder's birdhouse card on her Stamp A Latte blog. I worked on figuring out the shape, based on Leonie's dimensions, which were in metric. I used a scrap of paper the size of our cards, which when folded is 4-1/4 x 5-1/2 inches to make a template of sorts. I se that mine isn't perfectly symetrical though! 

We found some Stampin' Up! early espresso cardstock for the card base. And a piece of greyish blue cardstock  for the layer on top. At first we ran the cardstock throught the cuttlebug with a woodgrain embossing folder, but that made it difficult to cut the 1-1/2 inch circle in the center. Lynette used her Circle Custom Cutting System from Creative Memories. It didn't want to cut after the cardstock was dry embossed. The easy fix was to just cut the circle before dry embossing which worked well. 

I used Distress Brushed Corduroy ink to the edges of the birdhouse. 

Lynette colored the stamped birds with colored pencils. Then she fussy cut them. The bird inside is from Stampin' Up!'s set, Nature Walk.  The stamp on the outside is from a set that Lynette bought at Dollar Tree.  I stamped the sprig of leaves, from Altenew's Wildflower Garden.  But I see now that I should have added some brown ink to the branch part so that white did not show! Next time!

Lynette added the circle cut out to the back of the blue layer after positioning the bird inside. We had a lot of fun making this birdhouse card! I love using birds on my card now that it's spring! 

Thank you so much for visiting.
Peace and all good

Wednesday, May 17, 2023

Stampfest at Lynette's, May 16, 2023

Lynette and I had a great time stamping and visiting yesterday, May 16, 2023. We started with a nice walk along the river in the beautiful warm sunshine. Then Lynette served us a delicious lunch at her house: her famous mostaccioli crab salad, potato salad, tossed salad and lemon squares for desert. I should have taken a picture of the food! ...and should have asked Don take a picture of Lynette and me with our cards. Maybe next time!

You can click on any image to view a larger version.

Inspired by a card viewed online somewhere...we used Stampin' Up! Pool Party color paper. Thank you Linda B. for giving us all that cardstock!

I think we used Stampin' Up! whisper white card stock.  Also, we noticed the ink color seems more vibrant on the SU white card stock, when compared to stamping on Walmart's  white cardstock.

To get the very narrow black framing layer, 
We cut the black layers 4-3/4 x 3-1/2 inches
and cut the white layers 4-5/8 x 3-3/8 inches
I had trouble cutting at first, getting all confused, so Lynette took over the task. Thanks, Lynette!!!

Cuttlebug embossing folder: Birds and Swirls

Stamps: 
Stampin' Up! Nature Walk.
Gina K Fearless Flyers-sentiment

Inks: 
Gina K ocean mist and jelly bean green
Versafine onyx black

Colored pencils to color the fussy cut birds.

This card was stamped using Gina K's Tropical Blooms set. Thank you Mona S. for giving me this stamp and dies set along with the whole kit: the Hearts & Flowers StampTV Kit from January 2018. It's so much fun stamping these flowers!

Inks:
Gina K bubblegum pink, passionate pink, jelly bean green, fresh asparagus
Versafine onyx black


Using heavy weight white cardstock (I think from Hobby Lobby?) we stamped the butterflies with Versamark ink. Then used white embossing powder and heat set the butterflies.

We used wrinkle free distress technique by dabbing three distress inks onto a craft sheet
broken china, blueprint sketch and wilted violet.
We spritzed the inks with water. Then we placed our paper on top of the inks, lifted the paper and then dabbed the edges of the paper back into the inks a few more times to get color on the edges.  We set these layers aside to dry. When dry, Lynette placed some big acrylic blocks on top of these to try and flatten the paper. Then we used thin foam tape to adhere to our white cardstock base.

Thank you for visiting!
Wishing you Peace and all good!

Monday, April 8, 2019

Springtime

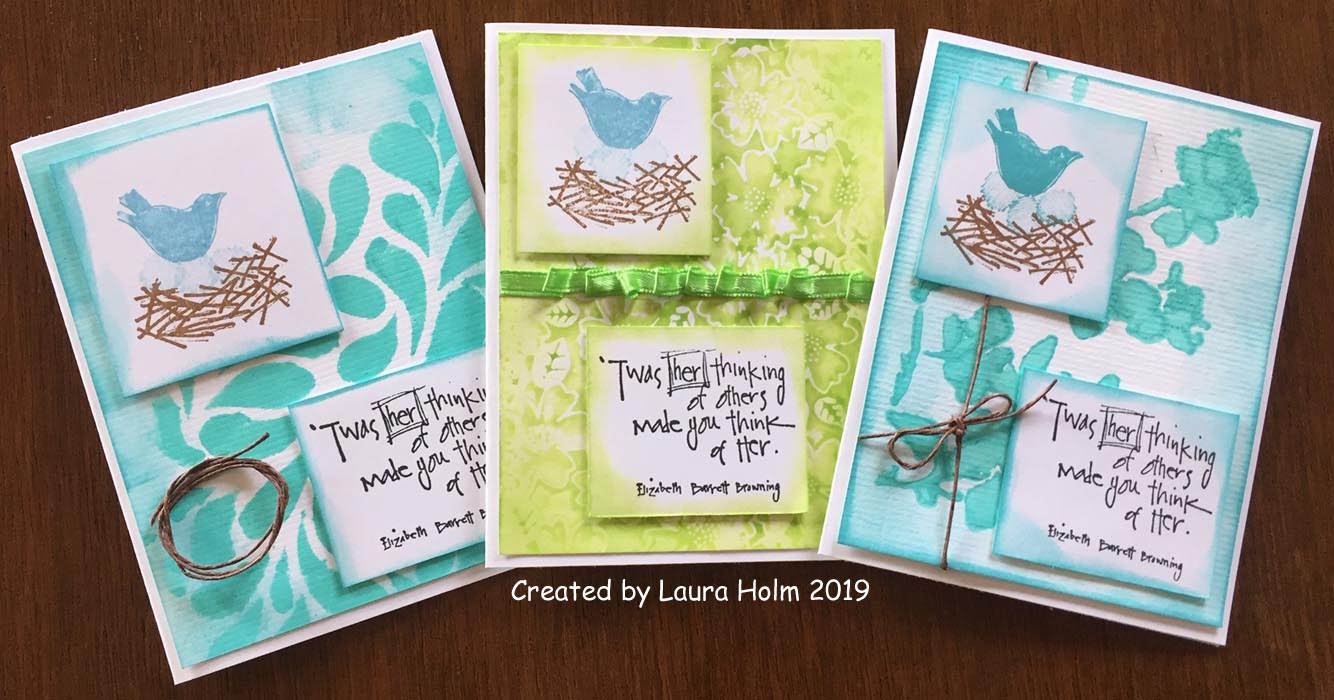
Springtime, warmer weather, the birds and their songs...just love this time of year.
Pulled out my old Printworks bird and sentiment stamps to make a few cards.
You can always click on an image to see a larger view.

This background was made from my new Gina K water droplets stencil and Dina Wakley's turquoise acrylic paint from Ranger.
Ink:
distress broken china, tumbled glass, gathered twigs
Versafine onyx black

Loops of twine attached with a flat glue dot

This background was made with Dina Wakley turquoise acrylic paint sponged onto a Tim Holtz Stampers anonymous flower stencil. I wish Tim's stencils had names to identify them.

This background was made with a Park Lane embossing folder called Flower Retreat. I used embossing folder stamping technique with twisted citron distress paint from Tim Holtz-Ranger.
Attached a ribbon cinching it as it was pressed onto a strip of "super high tack" tape-I used Scrapbook Adhesives brand.

Hoping you are enjoying a beautiful day! 

Tuesday, April 17, 2018

Tuesday Card of the Day

Happy Tuesday my dear friends! Hope things are going well for you!
Today's Card of the Day for the Enjoy Michael Strong Stamps Groups.io
features Michael Strong's Mini Hummingbird from his Mini Wings set.

The embossed layer was a scrap I saved.
It was made with an embossing folder stamping technique
where I DID run the paper through my Cuttlebug afterward.

1. Dabbed distress broken china and walnut inkpads
onto my Sizzix Retro Circles embossing folder
-the side with the logo

2. Spritzed with water, added the paper, closed the embossing folder

3. Ran it through my Cuttlebug.

Normally for this technique, I would skip the 3rd step
and just press the paper down with my hands.
There would be no raised surfaces, just color.

It's fun to experiment with this. Here are two tutorials I really like:
Heidi Wegman's Embossing Folder Stamping
and
Audrie Magno-Gordon's Embossing Folder Stamping

For the rest of my card, I added a strip of turquoise paper
which was dry embossed with the Flowers and Leaves folder from Spellbinders.

I made my own background on the front
by stamping repeatedly repeatedly with a "thanks" word stamp
from Stampin' UP! in distress antique linen ink.

The curvy banner is from a Hero Arts Stamp & Cuts set.
Used a piece of fiber/ribbon from my stash to tie around center layer.

Here is a look at the inside of the card
where I stamped Mike's Mini Hummingbird and sentiments from Stampin' Up.

Thank you so much for visiting!

Monday, January 22, 2018

Twas Her - Bird Stamp Set

I decided to make this card after seeing Carol Read's sweet bird card here.
My version is quite simple. I'm sorry this first image is blurry.

I like how there is extra space inside the card for stamping
and for a hand written note.

I made two of these and used them as thank you cards for my daughters.

Stamps used:
4 Printworks stamps-
Birdie-B4086
Nest-called Shelter-B4085
Egg-called A Good Egg-P4083
Sentiment-called Twas Her Thinking-E3432
and 
Hero Arts Ribbon Messages Stamp & Cut set

Distress inks: broken china, tumbled glass, gathered twigs

Swiss Dots cuttlebug embossing folder
Nestabilities Oval dies

Thanks so much for visiting!

Sunday, August 21, 2016

Coloring and Painting Scribbly Birds

Here are some Scribbly Bird cards inspired by Anneke De Clerck's bird card blog post 
 
 I embellished wrinkle free distress backgrounds from my stash:
sponged mermaid lagoon ink over a Tim Holtz' Honeycomb stencil,
stamped Tim's Bitty Grunge stamp with stormy sky.
I made my own 3 circle stencil with cardstock and a  5/8 inch punch
applying pearlescent white Adirondak acrylic paint through the circles with a paintbrush.
 
For the open circles, I used Dina's technique-
dab some acrylic paint on the bottom of a paint bottle and apply it to your piece. 
I also found the open side of one of the screw tops of the dabbers worked even better.
It's a pity my Adirondak paint dabbers are drying out before I can use them up.
 
For the Scribbly bird above, I used card stock, 
stamped it with a BoBunny text stamp in pumice stone.
Then on top of that, I stamped Dina's bird on top, using Versafine black onyx ink. 
When dry I used colored pencils to add color.


 Here are some photos of my work along the way.

 I tried Dina's method of dry painting the Scribbly birds, 
which have been stamped on old book paper.
I used red colored pencil for the tiny heart. She used paint. 
Afterward I outlined the heart with a Pitt Artist Pen 0.1 mm-Black India Ink.
Below are the 3 painted Scribbly birds.


 I added the sentiment from the set on some of my cards
cutting out the lines and attaching with Golden Soft Gel (Semi-Gloss) gel medium.


I used various fibers from by stash.


 Pulled out some strands of burlap, making circles to resemble a nest.

Thanks for visiting!