Showing posts with label Tim Holtz. Show all posts

Tuesday, March 24, 2026

Stampfest at Lynette's March 23, 2026

Yesterday Lynette and I had a great time stamping. We worked on ideas we have been thinking about.

Our trees in the sky card was fun to make. We used a layer of dark blue card stock from Lynette's stash, Stamped trees from Gina K's You Warm My Heart and Natural Silhouettes stamp sets with Versafine Onyx black ink. The die cut happy is from Hero Arts and the "birthday" is from Lynette's stash.

Lynette and I saw a card like made by Audrey Pettit on her Audrey Pettit Designs website. We had lots of fun with this. Seems like we do a lot of substitutions but thie time we actually had the Leafy Texture Fades embossing folder. We inked the raised side of the embossing folder with Gina K white pigment ink, then placed the kraft paper inside and ran it through the Cuttlebug. We die cut 3 flowers from the Tim Holtz Sizzix WILDFLOWERS Thinlits Die set from white cardstock. Then ink blended with Gina K's lemon drop, powder blue and lucky clover inks. Sentiments from Lynette's stash.

Lynette and I saw Vicki Perry's February 22, 2026 post in the Gina K Designs & StampTV Friends Facebook group where she created her own background paper using blue and brown inks. We both loved it and wanted to give that a try. We used leaf stamps from these Gina K's stamp sets: Gentle Silhouettes, Flower Builders, The Greatest Gift, the Original Wreath Builder and Hugs and Wildflowers and Fresh Florals (the Birthday Blessings sentiment). 

We ended up liking a kraft oval for the sentiment in black ink. And stamping flower outlines from the Hugs and Wildflowers set on blue cardstock. The white oval got lost in the background print and so did blue flowers stamped on white cardstock.

We always have such a great time together! I'm so glad that Lynette hosts this very fun day!

Thank you for visitng and wishing you
Peace and all good!


Thursday, October 23, 2025

Stampfest at Lynette's October 22, 2025


On Wednesday, October 22, we spent a wonderful day with Lynette. We went to a delicious Mexican Restaurant, La Marina Mariscos and enjoyed their lunch special, with lots of left overs to bring home.
Then we had a ball working on cards.We made a quick card stamping on  printed paper. Then we tried a simple ink swiping technique from Natasha Foote's YouTube Come Crafting with Natasha. 

Below are the cards we made with printed paper, inspired by Sharr Lm's Oct. 9, 2025 post on Facebook, at the Come Crafting with Natasha group. 


We used Lynette's Tim Holtz printed papers from her stash, stamping flowers in Versafine Onyx Black ink. 
Stamps:
Hero Arts wood mounted H3258 Real Dill
Gina K Natural Silhouettes
My Sentiments Exactly Happy Birthday

For the next four cards we tried Natasha Foote's Browns Only Technique, Video #1237 from Sept. 24, 2025


We used Gina K dark chocolate, warm cocoa and soft stone inks for the "land" in our panels. As shown in Natasha's video, we dabbed a small amount of brown ink on an acrylic block, spritzed it and tried to drag it across the white cardstock. It was difficult to drag. The ink did not go on smoothly. Natasha used the words, "hot mess" at one point...and we were thinking the same thing. Natasha encourages to keep on going and we did! 

NOTE Oct. 25, 2025...I just revisited Natasha's YouTube and noticed that when she dragged the inked and spritzed acrylic block across the paper, the block was held at an angle, so only part of it was touching the paper. That must be why we had trouble dragging it across the paper.

For the second panel we tried Natasha's "wet paintbrush and ink from an acrylic block" technique. That was a little easier. However after our panels were complete, we LIKED the uneven look of the browns and gray colors applied with the acrylic block. That method added more texture than just painting the browns and greys. We dried the paper with a heat tool and also set it aside to dry completely. 

We colored the sky by using blending brushes and ink.
Stampin Up orchid opulence, Gina K wild lilac, blue denim and blue in the navy.
For our lakes: Gina K powder blue and sea glass.

Stamps used:
Gina K Natural Silhouettes...very small pine tree
Gina K You Warm My Heart...various pine trees

The first two panels are Lynette's. The second two panels are mine. Lynette found some beautiful dark brown cardstock to back the panels. 

After a day, our panels look 200% better and I think we both are going to try this technique again!

Thanks for visiting! You can always click on an image to view a larger version.

Peace and All Good!

Monday, October 7, 2024

Stampfest at Lynette's October 2, 2024

On Wednesday, October 2, Don and I visited Lynette. We had a great time having lunch together at Buona Beef, stamping and later visiting and relaxing!

Here's another view of our cards.

Lynette wanted to try a stencil technique that I have used to make sympathy cards. We used the Lattice section of the Tim Holtz Stencil called Flourish And Latticework Thmm115 and Stampin' Up's cameo coral ink with a blending brush.  We stamped Gina K's long flower from the Lisa Hetrick designed Hugs & Wildflowers stamp set using SU's lucky limeade and cameo coral inks. The card base is a  heavy weight creamy white cardstock from Hobby Lobby.


When Lynette showed me the butterfly and stenciled cards she made based on Natasha Foote's YouTube A 'Must Know' For Crafters!!! The Classic Split #1040 I wanted to make it too! So Lynette cut the butterflies with dies from Crafters Companion and I added stenciling and ink blending to the card using the Flourishes portion of the Tim Holtz Stencil Thmm115 with distress broken china and SU gable green inks. Also used a piece of waste canvas as a stencil. Lynette's work was the hard part, getting all those pieces removed from the die! 

We were both interested in making the Scribbly Bird cards posted on Anneke De Clerck's blog, Some Fiddling on the Kitchen Table. Below are 2 of Lynette's birdie layers, then 2 of mine:


We used Lynette's Caran D'ache watercolor crayons and a water brush on cold press watercolor paper--the smooth side. Used a heat tool to help dry the panel before stamping with Versafine onyx black ink and Dina Wakley's Scribbly bird stamps. We also stamped a separate bird image for layering as shown by Anneke, leaving the legs and feet of the image on the panel showing. We used a zig permanent pigment ink marker to hand draw leaves and circles and lines and a pink marker for groups of dashes, as Annke showed.  It was so relaxing to make these layers!

We also stamped some floral designed panels, using Gina K's Hugs & Wildflowers stamps designed by Lisa Hetrick. We duplicated the panels we made on our March 27, 2023 Stampfest. However we used Stampin' Up inks: lovely lilac ink for the flowers and old olive for the stems and leaves. We used an embossing stylus after inking the leaves to create the "line" in the center of each leaf.

After we finished stamping, Lynette served us an assortment of crackers with a Double Gloucester cheese with onion and chive, tortilla chips and salsa, a pumpkin spice caramel cluster candy, and Motif Cabernet Sauvignon Red Hills Lake County wine from Trader Joe's. We enjoyed watching some old music videos on YouTube on the TV. It was great fun visitng, stamping and relaxing!

Thank you for visiting!
Peace and all good!

Friday, December 15, 2023

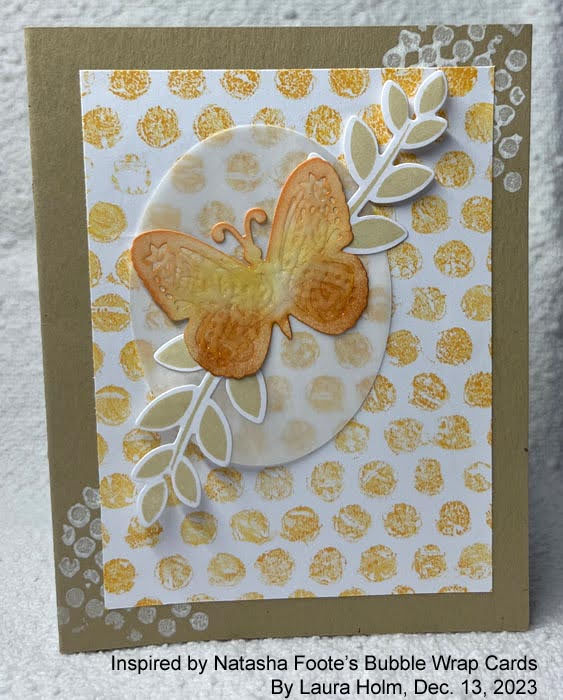
Bubble Wrap Background Cards

I made these "bubble wrap background" cards after seeing Natasha Foote's Youtube:  #UseWhatYouHave - BUBBLE WRAP Edition! Inking/Cardmaking fun with BUBBLE WRAP! from  Nov 25, 2020. 

I cut a used bubble wrap bag from Amazon to fit my 4 by 5-1/4 inch layers of cardstock, cutting the bubble wrap slightly bigger so it would extend over the edge of my cardstock.

I dabbed the ink pad directly onto the bubble wrap. Then pressed that onto my cardstock sitting on scrap paper on my desk.The bubbles transferred nicely, just pressing with my hands. I did not sponge a second color of ink like Natasha did. May try that sometime. I liked her brown and victorian velvet combo.  

I used distress oxide inkpads: wild honey, broken china and worn lipstick.. However after these were done, I did a test comparing the plain distress ink with the oxides and both looked very similar.

Once the bubbles were dry, I trimmed to 3-1/2 by 4-3/4 inches except for the blue one, which was an odd shaped small scrap, 3-3/8 by 4 inches.

Butterfly from Momenta Set of 5 Embossing Folders Hello There Butterfly
Leaves from Gina K Perfect Poinsettia, stamped in Gina K sandy beach ink
Oval vellum layer cut from Hero Arts Nesting Oval dies
The kraft card base was from my stash which already had the white small circles stamped on the edges. I think that was white acrylic paint.


Butterfly from Martha Stewart Butterfly punch, broken china ink blended onto it
Scalloped circle vellum layer cut from Spellbinders
Leaves from Gina K Perfect Poinsettia, stamped in broken china and distress hickory smoke
Used a pumice-grey cardstock from my stash.
Butterfly die cut from Momenta Hello There Butterfly set. Distress spun sugar ink blended onto it.  Used a cut out layer of the center of the butterfly from a separate, botched butterfly.
Leaves stamped in distress hickory smoke.
Used a pumice-grey cardstock from my stash.

Butterfly stamp from Tim Holtz/Stampers Anonymous Mixed Media collection Stamps/Stencil THMM144 (wow that's a big name for a stamp set!). Stamped in oxide worn lipstick and fussy cut.
Leaves stamped in distress broken china and distress hickory smoke.

Leaves from Gina K's Perfect Poinsettia set,  stamped in  distress broken china and distress hicory smoke.

Thank you for visiting!
Peace and all good!

Monday, November 27, 2023

Halloween Cards 2023


In looking back at my 2020 Halloween cards, I decided to make this cat and moon card AGAIN. It was inspired by Tami Bastiaans card from her Plays Well With Paper blog.

Had fun with the Tim Holtz Stampers Anonymous Snarky Cat Halloween set. 

For the moon, I just outlined a punched circle with a Faber Castell PITT pen and then added dots inside for the moon's craters.

Trees are from Stampscapes. 


Fussy cut my own bats and ghosts drawn from home made templates.
Bird background from a stencil in my stash.


Oval alphabet from Michael Strong. Candy corn from Hero Arts. Pumpkins are an unmounted stamp.

Thanks for visiting!
Peace and all good!

Wednesday, October 25, 2023

More Tim Holtz Wildflowers 2 Cards


This time I used white cardstock to die cut these flower from that old Tim Holtz Sizzix Wildflowers #2 Thinlits die set. To cut these easily I needed to put the die cut side up and add a cardboard shim. 

The backgrounds are a variation of my August 22 cards. Sadly, I needed a sympathy card.

With blending brushes, added Gina K Blue Lagoon and distress peeled paint inks to the flower die cuts.

Background: 
Stampin' Up's background floral script in Gina K dark chocolate ink
Hero Arts window screen E2305 in Gink K wild dandelion ink
Stampin' Up's circles Itty Bitty Background (from 1997!) in Gina K key lime ink
Sentiment from Great Impressions stamping in Gina K dark chocolate

Wheat stamp from Inkadinkado's Meadow stamped in distress wild honey


I cut these flowers with white cardstock and added color with blending brushes. Used a piece of book paper as a background.

Thanks for visiting! 
Wishing you peace and all good!

Tuesday, August 22, 2023

Wildflowers #2 Thinlits Die Cards

Made some cards with an old Tim Holtz Sizzix Wildflowers #2 Thinlits die set. I rarely used these dies because they did not cut nicely. Cardstock stuck in them or the paper ripped. 

Recently, I saw an advertisement for a self healing pad to use in a die cutting machine. That gave me an idea to try using my old eyelet self healing pad, substituting this and 2 cardboard shims for one of the die cutting plates. Did not work any better than before. 

Then I remembered that Gina K said to put dies facing upward in the die cutting machine. So back to my original plates. I taped the die to my cardstock and placed it facing up. That worked like a charm! I cut two more sets of the three flowers and made these cards.  Hope this continues so I can make more cards with the Wildflowers #2 dies!

This is the inside of the card.

Stamps:
Stampin' Up flowers background stamp from 2002 Botanicals set
Stampin' Up Watercolor minis-butterfly 
Tim Holtz mixed-media Stampers Anonymous clear stamps/stencil set THMM114
Tim Holtz mixed-media Stampers Anonymous clear stamps/stencil set THMM121
Dimensions-Crafts clear Happy Birthday stamp
Vertical Happy Birthday from Verses Rubber Stamps BB0424-C

Inks: Stampin' Up barely banana
Gina K: dark chocolate, jelly bean green, wild dandelion
distress: dried marigold,

Used a brown permanent Zig pen to draw the squiggly lines border


This fun fold card was inspired by Jennifer McGuire's YouTube: NEW! Stenciled Stamping Technique.  I just used her fun fold idea. She took a half sheet of cardstock, 5-1/2 inches tall and 8-1/2 inches wide. She scored that at 1-1/4 inches and 5-1/2 inches to get the fun fold card, 4-1/4 x 5-1/2 inches. For this card, I used yellow paper, dry embossed with Cuttlebug's Swiss dots and cut a piece- 4-1/4 inches wide by 5-1/2 inches which was adhered to the right side of the front. .

The happy happy happy  birthday sentiment is from Stampabilities.

This card was inspired by a gorgeous card I saw on Splitcoast Stampers created by Sabrina in September 2019. She goes by Cook22 on Splitcoast Stampers. After embossing with Sizzix Bricked embossing folder, I blended Gina K's wild dandelion, jelly bean green and sweet mango.

Happy Birthday sentiment from Stampabilities stamped in Gina K dark chocolate. Also used the same background flowers stamp from Stampin' Up's 2002 Botanicals set.

This is the inside, pretty much like the other cards.

I added some large flowers to the left side of this fun fold card, inspired by the same Jennifer McGuire's  YouTube NEW! Stenciled Stamping Technique from May 2, 2023. However, I did not do her beautiful stenciling technique. I used Gina K's stamps and dies from Tropical Blooms that a dear friend gave me. Thanks again, Mona!  This was very fun to do. I need a little more practice with the placement of the leaves.  It was difficult to take pictures of it closed. That's why I have the acrylic block against it.

Here you can see how it opens a little. I used a Cuttlebug swiss dots embossing folder on white and also green paper that I added to the sides. I have not decided if this will be a birthday card or ??? Will add a sentiment on the front and inside later.

Inks: 
Gina K sweet mango, jelly bean green and wild asparagus
distress rusty hinge, vintage photo

Thanks for visiting.
Peace and all good.

Saturday, July 29, 2023

Six Airplane Cards

There are lots of birthdays coming up in August. I mass produced these last month. These cards are very fun to make.


Stamps used: 
Tim Holtz Visual Artistry Stampers Anonymous Cling rubber set called The Journey, CSS 30232
Tim Holtz City Central clear stamp-heart with lines coming out from it and red stars. I did not use the ticket stamp from this set, however. Instead used the ticket stamp from...
Tim Holtz Curious Possibility CSS30195. The Ticket stamp is the same as the one from City Central, but this one is larger! Tim has multiple images in different sizes in different stamp sets!
Stampin' Up! Office Ephemera-airplane stamp

Hero Arts -CL488 Type-the HAPPY BIRTHDAY sentiment

Inks: 
distress faded jeans, frayed burlap
Gina K-red velvet
Stampin' Up!-creamy caramel

Thanks for visiting!
Peace and all good!