Showing posts with label Dina Wakley. Show all posts

Monday, October 7, 2024

Stampfest at Lynette's October 2, 2024

On Wednesday, October 2, Don and I visited Lynette. We had a great time having lunch together at Buona Beef, stamping and later visiting and relaxing!

Here's another view of our cards.

Lynette wanted to try a stencil technique that I have used to make sympathy cards. We used the Lattice section of the Tim Holtz Stencil called Flourish And Latticework Thmm115 and Stampin' Up's cameo coral ink with a blending brush.  We stamped Gina K's long flower from the Lisa Hetrick designed Hugs & Wildflowers stamp set using SU's lucky limeade and cameo coral inks. The card base is a  heavy weight creamy white cardstock from Hobby Lobby.


When Lynette showed me the butterfly and stenciled cards she made based on Natasha Foote's YouTube A 'Must Know' For Crafters!!! The Classic Split #1040 I wanted to make it too! So Lynette cut the butterflies with dies from Crafters Companion and I added stenciling and ink blending to the card using the Flourishes portion of the Tim Holtz Stencil Thmm115 with distress broken china and SU gable green inks. Also used a piece of waste canvas as a stencil. Lynette's work was the hard part, getting all those pieces removed from the die! 

We were both interested in making the Scribbly Bird cards posted on Anneke De Clerck's blog, Some Fiddling on the Kitchen Table. Below are 2 of Lynette's birdie layers, then 2 of mine:


We used Lynette's Caran D'ache watercolor crayons and a water brush on cold press watercolor paper--the smooth side. Used a heat tool to help dry the panel before stamping with Versafine onyx black ink and Dina Wakley's Scribbly bird stamps. We also stamped a separate bird image for layering as shown by Anneke, leaving the legs and feet of the image on the panel showing. We used a zig permanent pigment ink marker to hand draw leaves and circles and lines and a pink marker for groups of dashes, as Annke showed.  It was so relaxing to make these layers!

We also stamped some floral designed panels, using Gina K's Hugs & Wildflowers stamps designed by Lisa Hetrick. We duplicated the panels we made on our March 27, 2023 Stampfest. However we used Stampin' Up inks: lovely lilac ink for the flowers and old olive for the stems and leaves. We used an embossing stylus after inking the leaves to create the "line" in the center of each leaf.

After we finished stamping, Lynette served us an assortment of crackers with a Double Gloucester cheese with onion and chive, tortilla chips and salsa, a pumpkin spice caramel cluster candy, and Motif Cabernet Sauvignon Red Hills Lake County wine from Trader Joe's. We enjoyed watching some old music videos on YouTube on the TV. It was great fun visitng, stamping and relaxing!

Thank you for visiting!
Peace and all good!

Wednesday, August 21, 2024

Stampfest at Lynette's August 15, 2024

Don and I went to visit Lynette on Thursday, August 15, 2024. We enjoyed lunch at the Sugar Bowl restaurant...each of us ordered the Hobo Skillet. It was delicious! We all took home leftovers! 

After we were done stamping, Lynette served us her wonderful Seafood Salad, plus chips and salsa and Brie cheese and crackers and some Espiral Vinho Verde!

For our Stampfest inspiration, Lynette found an uncredited pin on Pinterest displaying a  sweet bird card made with one of Dina Wakley's Scribbly birds. I brought that set. Also brought Gina K's  Mandala stamp set and the Stampin' Up! Artistically Inked set-recently gifted to me by my dear friend, Mona.

Lynette made these Mandalas using Gina K's inks: Grass Green, Ocean Mist, Turquoise Sea, and Blue Raspberry. We followed Jennifer McGuire's Kaleidoscope Card YouTube.  

We both worked on these fun bird cards!  I stamped the Dina Wakley Scribbly bird twice on old music paper with Versafine Onyx Black ink. Lynette fussy cut them. 

We stamped the white card base with a stamp called Woven Linen by All Night Media #408K using SU's bordering blue ink. Then I added various Gina K ink colors with blending brushes to the card base: Powder Blue, Turquoise Sea, Wild Dandelion and Kraft.

We tore a strip of old book paper as shown and used Gina K Kraft ink on the edges. We made the ruler strip with an embossing folder, trimming to fit. Lynette punched the hearts from red cardstock. We used a Stampendous clear set #SSC039 Window Box for the happy birthday sentiment. We stamped it in Versafine Onyx Black ink.  

With the Stampin' Up! Artistically Inked stamp set, we followed Jackie Bolhuis' YouTube tutorial.  Thanks to Mona for the stamps and for sharing Jackie's One Card Wonder tutorial. This technique makes it so easy to create 4 card fronts at once using 8-1/2" by 11" cardstock. I had already tried this technique when I received these stamps from Mona. If you want to see my samples go to my Artistically Inked cards here. 

As usual, we had a great day visiting and stamping! 

Thank you for visiting!
Peace and all good!

Friday, December 6, 2019

Dina's Handwritten Heart Collage Cards

I am on a roll and having fun making my own backgrounds with distress ink.
Smooshed color onto an acrylic block, added a bit of water using my water brush and painted the colors onto white cardstock. It actually works better with watercolor paper because the regular card stock does not hold up well to a lot of brushing. I used distress fossilized amber, worn lipstick and picked raspberry.
Allowed to dry and stamped with Dina Wakley's Handwritten Heart Collage stamp using Versafine Onyx Black ink. After the stamping was dry I fussy cut along the edge of the stamped border. Then dry embossed the layer with Park Lane's Flower Repeat embossing folder 
and sponged distress ink onto the edges and over parts of the top.

 Wrapped twine around the layer and tied with a bow before adhering to a kraft card.

This one became a thank you card--used Stampin' Up! sentiment, fussy cut with a deckle edge scissors.

Thanks for visiting! Hope all is well with you and yours!


Monday, April 8, 2019

Springtime

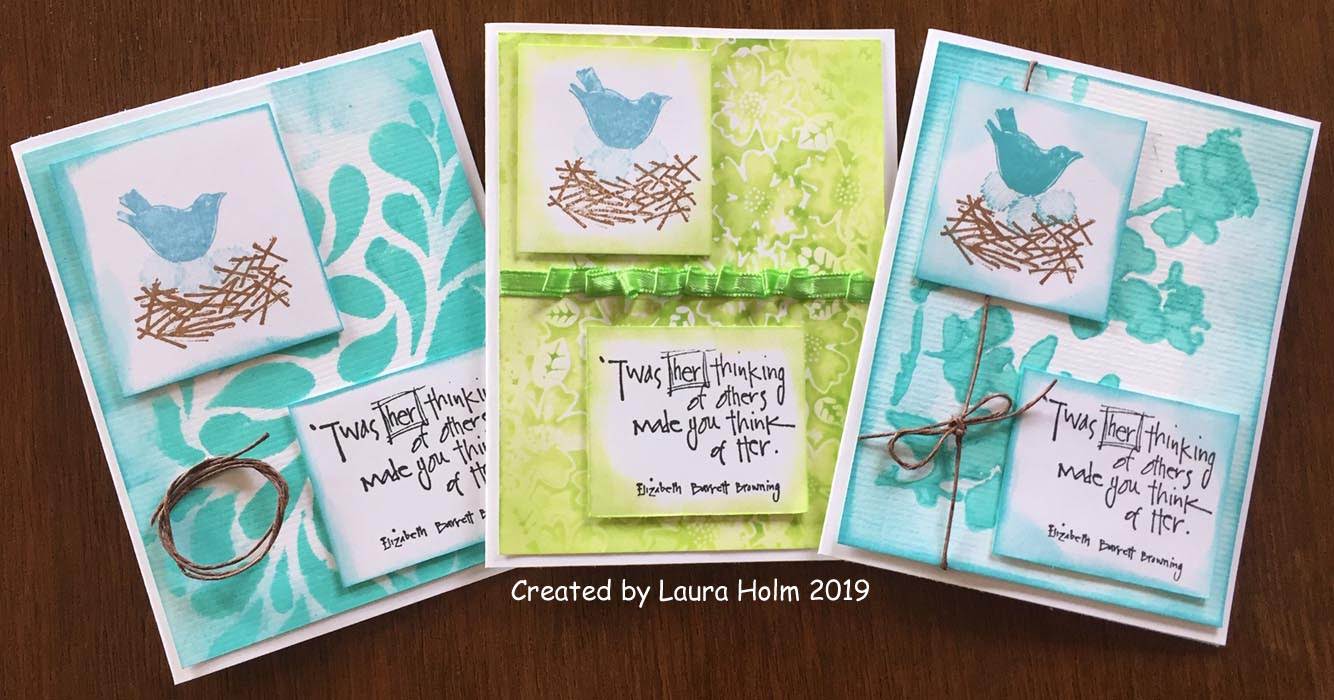
Springtime, warmer weather, the birds and their songs...just love this time of year.
Pulled out my old Printworks bird and sentiment stamps to make a few cards.
You can always click on an image to see a larger view.

This background was made from my new Gina K water droplets stencil and Dina Wakley's turquoise acrylic paint from Ranger.
Ink:
distress broken china, tumbled glass, gathered twigs
Versafine onyx black

Loops of twine attached with a flat glue dot

This background was made with Dina Wakley turquoise acrylic paint sponged onto a Tim Holtz Stampers anonymous flower stencil. I wish Tim's stencils had names to identify them.

This background was made with a Park Lane embossing folder called Flower Retreat. I used embossing folder stamping technique with twisted citron distress paint from Tim Holtz-Ranger.
Attached a ribbon cinching it as it was pressed onto a strip of "super high tack" tape-I used Scrapbook Adhesives brand.

Hoping you are enjoying a beautiful day! 

Thursday, June 28, 2018

Romper & Stamped Label

Click on image for larger view
 I sewed this romper for our 18 month old granddaughter. Last summer I made her a similar romper using a free pattern from Melly Mora of Melly Sews. I needed to enlarge the pattern so I compared Melly's pattern to Simplicity pattern #1447 and came up with this.  I did not like the back zipper in Simplicity's pattern. I really liked Melly's lined bodice, so I used both patterns as guides and drew my own bodice. I used the Large size in the Simplicity pattern to guide me in the total length of the romper. Pretty much used the pattern for Simplicty's shorts/pants. The shorts front were wider than the bodice, so I made gathers to fit.

I watched Melly's wonderful video tutorial as I sewed. It's on her blog page and also on YouTube. She does a great job with sewing technique and step by step instructions. I like how Melly added a piece of fusible interfacing to the crotch where the 3 snaps are applied. I had a little trouble with the snaps going through my seam allowance- my fault! I did not open the seam allowance. Instead I serged the seam allowance and pressed it to one side. That made a thick area for the snap to go through. My cotton fabric is thin so the snap did finally get set. I always worry that my home made snaps will fall apart. If you pound too hard on the snaps, the do not get set right.

Click on image for larger view
I used Melanie Ham's YouTube tutorial to make the red fabric flower. I added a narrow seam on the ends of the 20 inch strip. The total width is just under 3 inches as instructed. The strip is folded with the right side out (once the end seams are sewn). Then it's pressed with an iron.  I stitched down the end in the center to cover the fabric gathers, which had raw edges. It is hand stitched to the romper.

Click on image for larger view
I have been looking for sew-in labels for my gift sewing projects. I had labels from years ago and used them up finally. You can see my attempt to stamp my own labels using preshrunk cotton twill (given to me by Lynette) and a custom stamp I bought from RubberStamp.net.  I chose an unmounted stamp, 1 inch by 2 inches. I attached it to a wood block using double sided foam sold for that purpose from RubberStamp.net.

For stamping with paint, I mixed equal parts of  Dina Wakley acrylic-Night is the color
and
Liquitex fabric medium.
Applied the paint mixture to the stamp with my finger. Next time I'll try a foam make-up sponge. Some areas got "over-inked" and smudged.

After letting the paint dry overnight, I heat set it with an iron and cotton press cloth.
I hemmed 2 of the labels with my sewing machine. That was quite tedious, so I decided to cut the edges with Grandma Stelzer's pinking shears.

Click on image for larger view

Now I will have to wait and hope that the print on my labels remains after laundering.

Thanks so much for visiting! Hope your day brings happy surprises!

Tuesday, February 14, 2017

Happy Valentine's Day and Tuesday Card of the Day

Happy Valentine's Day! I just love Valentine's Day.
It's such a special day to celebrate love and friendship!
My parent's were married on Valentine's Day way back in 1953!

Today I'm sharing some file folder Valentine cards I made by cutting kraft paper in half
to measure 4.25 x 5.5 inch
 then folding that like a card.
I made tabs with my Envelope Punch Board
then cut away the approximately 1/2 inch wide strip with my paper trimmer.
Before I had the Punch board, I just made the tab with my paper trimmer,
scissors and a corner punch. Easy and fun!


For the inside I added this "file" stamped with 
Dina Wakley's big Handwritten Heart Collage stamp. 

Stamps:  Michael Strong, Hero Arts, Ranger-Dina Wakley, PSX
Ink: Versafine black onyx, 
Distress-worn lipstick, festive berries, barn door, mowed lawn.
Thanks for visiting
and
HAPPY VALENTINE'S DAY!!

Tuesday, January 31, 2017

Lady Face Painted and Collage Cards

Inspired by Dina Wakley and Jane Davenport, I've been working with Dina Wakley's heavy body acrylic paint, stamps, stencils and finding some relaxation and stress relief! Instead of working inside my art journal, I worked on separate pieces of watercolor papers from my stash.

Dina Wakley makes this look so easy in her YouTube videos. It was a bit of a struggle for me! I guess I thought I could just spread some paint on paper and it would look great...not!
I think it's better with layering the paint...and adding stencils and stamps.

I drew a few faces with a PITT India Ink marker pen. On some of these I added watercolor pencil to color to the hair and eyes, but the PITT marker bled, so I wasn't sure that was the way to go. My pieces are small-they fit on a 4.25 x 5.5 inch card (or smaller). 
The "mood du jour" is part of a Dawn Houser/Inkadinkado stamp. The leaf is from What I love by Stampin' UP!

I really like how the Golden Soft Gel (Matte) medium worked to adhere the book page strips. They dried to a nice matte finish. In the past I had used a semi-gloss medium, which has a shine to it. The matte finish makes it look so much better! 

The "think" is part of a Dina Wakley Media 6 by 9 inch Stencil called Hey You. Originally I stenciled the "don't overthink", but I worked over the "don't over" and just left "think". Decided to add "don't" and "just create" with my PITT India ink pen and  then Gelly Roll Classic white pen. The lady is from Hampton Arts-Time Flies. I used black Versafine ink. The leaves, from SU, same as above, were stamped with Dina's "night" paint, which is a very dark blue.

The face here is stamped with distress vintage photo using Rubber Stampede's She knows #3652C. For the white circles I used the plastic cover from a paint dabber. Used a piece of sequin waste to stencil the little circles on the right using Dina's white paint.

This face is stamped with distress walnut stain ink using Dawn Houser/Inkadinkado Camp Rouge French lady face stamp #8340-N. I mixed Dina's ruby and lemon paints to create the orange color. The white circles on the bottom left were made with the sequin waste stencil. The other white "circles" were added by hand with the paintbrush.

Thanks for visiting! You are welcome to share any tips or ideas on this topic!

Sunday, August 21, 2016

Coloring and Painting Scribbly Birds

Here are some Scribbly Bird cards inspired by Anneke De Clerck's bird card blog post 
 
 I embellished wrinkle free distress backgrounds from my stash:
sponged mermaid lagoon ink over a Tim Holtz' Honeycomb stencil,
stamped Tim's Bitty Grunge stamp with stormy sky.
I made my own 3 circle stencil with cardstock and a  5/8 inch punch
applying pearlescent white Adirondak acrylic paint through the circles with a paintbrush.
 
For the open circles, I used Dina's technique-
dab some acrylic paint on the bottom of a paint bottle and apply it to your piece. 
I also found the open side of one of the screw tops of the dabbers worked even better.
It's a pity my Adirondak paint dabbers are drying out before I can use them up.
 
For the Scribbly bird above, I used card stock, 
stamped it with a BoBunny text stamp in pumice stone.
Then on top of that, I stamped Dina's bird on top, using Versafine black onyx ink. 
When dry I used colored pencils to add color.


 Here are some photos of my work along the way.

 I tried Dina's method of dry painting the Scribbly birds, 
which have been stamped on old book paper.
I used red colored pencil for the tiny heart. She used paint. 
Afterward I outlined the heart with a Pitt Artist Pen 0.1 mm-Black India Ink.
Below are the 3 painted Scribbly birds.


 I added the sentiment from the set on some of my cards
cutting out the lines and attaching with Golden Soft Gel (Semi-Gloss) gel medium.


I used various fibers from by stash.


 Pulled out some strands of burlap, making circles to resemble a nest.

Thanks for visiting!

Wednesday, July 13, 2016

Another Lady Face Card

With colored pencils I sketched another "lady face"
inspired by
Dina Wakley and Jane Davenport.
A friend gave me the dry embossed background layer. 

Stamps: Michael Strong, Inkadinkado/Studio K
Distress inks: twisted citron, worn lipstick
Versafine black onyx
Stick-on pearls.

Monday, March 21, 2016

Bits and Pieces

While trying to de-clutter my stamping area, I put together these cards
using bits and pieces I had collected.
Sponged distress inks dried marigold, twisted citron and broken china using a "stencil" which was a plastic film on my new laptop keyboard. Flowers stamped in wild honey and squeezed lemonade.
Used one of my favorite Stampin' Up! sets: Watercolor Garden.

This distress ink background was calling for Dina Wakley's Scribbly Birds
and my vertical Happy Birthday by Verses. 
Used a strip of tulle for the bow at the bottom. It's difficult to see. 
Ink: Versafine black onyx

Used a recycled piece (leaves) and a previously stamped text piece.
The gentlemen,stamped in distress vintage photo and sponged in black soot,
 are from a Tim Holtz Visual Artistry Collection set called Curious Possibility

Thanks for visiting!

Wednesday, December 30, 2015

Lady Face Cards

After seeing Dina Wakley's YouTube, Learn to Draw Artistic Faces
and borrowing Jane Davenport's book,
Drawing and Painting Beautiful Faces from the public library
I started sketching faces...
on the back of envelopes, on scrap paper, everywhere.
For these cards, I made a few sketches on white cardstock,
added some color with colored pencils and markers, then cut them out.
 I used Lynette's Stampin' Up! Notably Ornate Set
and added some of my own stamps to create some simple vintage, shabby-chic cards.


Used wrinkle free distress backgrounds from my stash
sponging additional color on them.

Stamps:
Stampin' Up! Notably Ornate, Friendship's Journey, Antique Collectibles, Letters from Friends,
Hero Arts
Dawn Houser

Distress Inks
mowed lawn, festive berries, spiced marmalade,  fossilized amber, wild honey, pumice stone, brushed corduroy

Colored pencils & Distress markers