Friday, December 15, 2023

Bubble Wrap Background Cards

I made these "bubble wrap background" cards after seeing Natasha Foote's Youtube:  #UseWhatYouHave - BUBBLE WRAP Edition! Inking/Cardmaking fun with BUBBLE WRAP! from  Nov 25, 2020. 

I cut a used bubble wrap bag from Amazon to fit my 4 by 5-1/4 inch layers of cardstock, cutting the bubble wrap slightly bigger so it would extend over the edge of my cardstock.

I dabbed the ink pad directly onto the bubble wrap. Then pressed that onto my cardstock sitting on scrap paper on my desk.The bubbles transferred nicely, just pressing with my hands. I did not sponge a second color of ink like Natasha did. May try that sometime. I liked her brown and victorian velvet combo.  

I used distress oxide inkpads: wild honey, broken china and worn lipstick.. However after these were done, I did a test comparing the plain distress ink with the oxides and both looked very similar.

Once the bubbles were dry, I trimmed to 3-1/2 by 4-3/4 inches except for the blue one, which was an odd shaped small scrap, 3-3/8 by 4 inches.

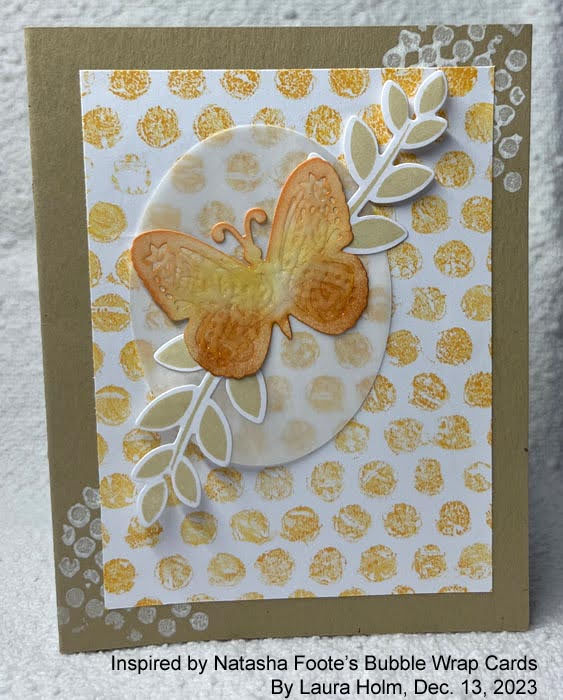
Butterfly from Momenta Set of 5 Embossing Folders Hello There Butterfly
Leaves from Gina K Perfect Poinsettia, stamped in Gina K sandy beach ink
Oval vellum layer cut from Hero Arts Nesting Oval dies
The kraft card base was from my stash which already had the white small circles stamped on the edges. I think that was white acrylic paint.


Butterfly from Martha Stewart Butterfly punch, broken china ink blended onto it
Scalloped circle vellum layer cut from Spellbinders
Leaves from Gina K Perfect Poinsettia, stamped in broken china and distress hickory smoke
Used a pumice-grey cardstock from my stash.
Butterfly die cut from Momenta Hello There Butterfly set. Distress spun sugar ink blended onto it.  Used a cut out layer of the center of the butterfly from a separate, botched butterfly.
Leaves stamped in distress hickory smoke.
Used a pumice-grey cardstock from my stash.

Butterfly stamp from Tim Holtz/Stampers Anonymous Mixed Media collection Stamps/Stencil THMM144 (wow that's a big name for a stamp set!). Stamped in oxide worn lipstick and fussy cut.
Leaves stamped in distress broken china and distress hickory smoke.

Leaves from Gina K's Perfect Poinsettia set,  stamped in  distress broken china and distress hicory smoke.

Thank you for visiting!
Peace and all good!

Monday, November 27, 2023

Stampfest at Lynette's November 15, 2023

Lynette and I had a great visit almost two weeks ago. We took a walk, had lunch at a nice restaurant and stamped! 

After watching Natasha Foote's YouTube #915 called Is the the best layout ever we made these cards.  We both loved how easy these cards were to make.
Close up of Lynette's card-with 2 pieces of coordinating paper cut to  3-7/8 by 5-1/8 inches, your first cut is 1-1/2 inches. Then you turn the pieces and your 2nd cut is 1-1/4 inches. You are able to make 2 cards! And use up some of that printed paper in the stash!

This is the card I made the night before coming to Lynette's to test out Natasha's idea. I used one of Lynette's Stampin' Up! Stamps for the "hugs and kisses".

On this card, I used Lynette's pretty kraft paper with a delicate design printed in black. I wanted to try my new Gina K stencil, Bold Bouquet. My inspiration was Gina K's YouTube, Gift Card Holder Card - Inspired by Mindy Eggen

Lynette let me look through her stash of stamps for a Christmas stamp for my Christmas cards this year. I found this beautiful PSX nativity scene. I stamped it in Gina K's blue denim ink.

Just wanted to include this photo with  "Graphic Tree" from Gina K. I was experimenting with possible Christmas cards.

Thank you for visiting!
Peace and all Good!
 

Halloween Cards 2023


In looking back at my 2020 Halloween cards, I decided to make this cat and moon card AGAIN. It was inspired by Tami Bastiaans card from her Plays Well With Paper blog.

Had fun with the Tim Holtz Stampers Anonymous Snarky Cat Halloween set. 

For the moon, I just outlined a punched circle with a Faber Castell PITT pen and then added dots inside for the moon's craters.

Trees are from Stampscapes. 


Fussy cut my own bats and ghosts drawn from home made templates.
Bird background from a stencil in my stash.


Oval alphabet from Michael Strong. Candy corn from Hero Arts. Pumpkins are an unmounted stamp.

Thanks for visiting!
Peace and all good!

Thursday, October 26, 2023

Faux Watercolor Cards


Inspired by Lindsay Weirich's YouTube: Faux Watercolor Stamped Cards I made these 5 cards. I really like the look Lindsay created...
  * her cool "book" background stamp
  * how she over-stamped that with purple swirls
  * and her dry embossed layers between the background and her faux watercolor flower layer.

 
I substituted a Michael Strong stamp, Cloissone Mosaic Frame for Lindsay's book background stamp. Used Tim Holtz Oxide ink pads:
Wild Honey on the top third 
Peacock Feathers on the bottom third
Shabby Shutters on the middle third, holding the inkpad at an angle, trying not to contaminate that pad with ink from the top and bottom thirds.

I placed the cardstock layer on top of the inked stamp and then added a piece of scrap paper over that and pressed with my hand. However, I decided to get out the brayer for better pressure.  

I had a lot of ink still left on the stamp, so I spritzed it and created a second layer as Lindsay demonstrated. Was able to make 2 cards!

Lindsay used a large swirly background stamp and purple ink to stamp over the books layer. I used a swirly stamp from an old Stampin' Up set called In The Sky. Since mine was a small stamp, I stamped multiple times with Stampin' Up! Orchid Opulence ink.

I created dry embossed layers using a script and then a musical notes embossing folder. Tore the edges to create smaller layers as Lindsay demonstrated. 
I added Stampin' Up!'s Going Grey ink on the musical notes-direct to paper from the inkpad. 
For the script, I used blending brushes to apply Gathered Twigs Oxide to color it.

I used Tombow and Stampin' Up markers to ink a flower stamp from Gina K's Wild Blossoms. Spritzed it with water and then stamped it. I added some Wild Honey Oxide to the edges of the paper with an aqua brush as Lindsay showed, using a dab of water on the top of the inkpad as a pallete.  I also flicked some of this wild honey ink-putting my little layer in a small plastic waste basket to contain the splashes!

I wrote Happy Birthday Debi with a Faber-Castell PITT pen Small point on white cardstock. Cut into a banner and added purple to the edges using the aqua brush and also flicked some purple onto it.

The Variations on this card:
Used Stampin Up Going Grey with blending brush on the musical notes layer.
Used Gathered Twigs Oxide, direct to paper on the script layer.


For the bottom layer, on white cardstock measuring 4 x 5-1/4 inches, I took a Distress Antique Linen inkpad and swiped it to add a bit of color.  Then dry embossed it with a Park Lane Leaves embossing folder.  Adhered it to the card.

I stamped Gina K's Rose Lace rubber background stamp with Gina K's Jelly Bean Green ink. Cut a strip: 1-1/2 x 5-1/4 inches and adhered it to the embossed layer. 

On the smaller layer, 2-1/2 x scant 3-1/2 inches I stamped the flower and leaves from Stampin Up's What I Love using Gina K's Red Velvet and ink and Jelly Bean Green Inks.

The Happy Birthday stamp is from Stampendous and stamped with Gina K's Red Velvet ink. I cut the tail of the banner freehand.

I used the Gina K's Rose Lace background rubber stamp for this and the next card for the entire background. I am so glad to finally use this background stamp. My dear friend, Mona gifted it to me a year and a half ago! Thanks so much Mona! 

I used Gina K's postage stamp die from Master Layouts 4. Used a  flower stamp from Gina K's Wild Blossom, coloring with markers and then spritzing with water as before. Also added color to the edges with the aqua painter and Wild Honey Oxide ink and water.

I used blending brushes to add color to the script layer: Wild Honey Oxide, Jelly Bean Green and Red Velvet the last 2 from Gina K.

Similar here except I used Distress Antique Linen and Gina K Bubblegum Pink with blending brushes on the dry embossed layers. 

The flower is from Gina K's Friendly Silhouettes. Used Tombow markers to color the stamp and spritzed with a little water. Outlined the layer with Wild Honey Oxide and also flicked some on the layer with the aqua brush.

Lately to adhere my layers on cards, I have been using a few strips of double stick tape along with Sizzix Quick Drying Express Glue. When I want a little dimension, I use foam tape.

Thanks so much for visiting!
Peace and all good!

Wednesday, October 25, 2023

More Tim Holtz Wildflowers 2 Cards


This time I used white cardstock to die cut these flower from that old Tim Holtz Sizzix Wildflowers #2 Thinlits die set. To cut these easily I needed to put the die cut side up and add a cardboard shim. 

The backgrounds are a variation of my August 22 cards. Sadly, I needed a sympathy card.

With blending brushes, added Gina K Blue Lagoon and distress peeled paint inks to the flower die cuts.

Background: 
Stampin' Up's background floral script in Gina K dark chocolate ink
Hero Arts window screen E2305 in Gink K wild dandelion ink
Stampin' Up's circles Itty Bitty Background (from 1997!) in Gina K key lime ink
Sentiment from Great Impressions stamping in Gina K dark chocolate

Wheat stamp from Inkadinkado's Meadow stamped in distress wild honey


I cut these flowers with white cardstock and added color with blending brushes. Used a piece of book paper as a background.

Thanks for visiting! 
Wishing you peace and all good!

Tuesday, August 22, 2023

Wildflowers #2 Thinlits Die Cards

Made some cards with an old Tim Holtz Sizzix Wildflowers #2 Thinlits die set. I rarely used these dies because they did not cut nicely. Cardstock stuck in them or the paper ripped. 

Recently, I saw an advertisement for a self healing pad to use in a die cutting machine. That gave me an idea to try using my old eyelet self healing pad, substituting this and 2 cardboard shims for one of the die cutting plates. Did not work any better than before. 

Then I remembered that Gina K said to put dies facing upward in the die cutting machine. So back to my original plates. I taped the die to my cardstock and placed it facing up. That worked like a charm! I cut two more sets of the three flowers and made these cards.  Hope this continues so I can make more cards with the Wildflowers #2 dies!

This is the inside of the card.

Stamps:
Stampin' Up flowers background stamp from 2002 Botanicals set
Stampin' Up Watercolor minis-butterfly 
Tim Holtz mixed-media Stampers Anonymous clear stamps/stencil set THMM114
Tim Holtz mixed-media Stampers Anonymous clear stamps/stencil set THMM121
Dimensions-Crafts clear Happy Birthday stamp
Vertical Happy Birthday from Verses Rubber Stamps BB0424-C

Inks: Stampin' Up barely banana
Gina K: dark chocolate, jelly bean green, wild dandelion
distress: dried marigold,

Used a brown permanent Zig pen to draw the squiggly lines border


This fun fold card was inspired by Jennifer McGuire's YouTube: NEW! Stenciled Stamping Technique.  I just used her fun fold idea. She took a half sheet of cardstock, 5-1/2 inches tall and 8-1/2 inches wide. She scored that at 1-1/4 inches and 5-1/2 inches to get the fun fold card, 4-1/4 x 5-1/2 inches. For this card, I used yellow paper, dry embossed with Cuttlebug's Swiss dots and cut a piece- 4-1/4 inches wide by 5-1/2 inches which was adhered to the right side of the front. .

The happy happy happy  birthday sentiment is from Stampabilities.

This card was inspired by a gorgeous card I saw on Splitcoast Stampers created by Sabrina in September 2019. She goes by Cook22 on Splitcoast Stampers. After embossing with Sizzix Bricked embossing folder, I blended Gina K's wild dandelion, jelly bean green and sweet mango.

Happy Birthday sentiment from Stampabilities stamped in Gina K dark chocolate. Also used the same background flowers stamp from Stampin' Up's 2002 Botanicals set.

This is the inside, pretty much like the other cards.

I added some large flowers to the left side of this fun fold card, inspired by the same Jennifer McGuire's  YouTube NEW! Stenciled Stamping Technique from May 2, 2023. However, I did not do her beautiful stenciling technique. I used Gina K's stamps and dies from Tropical Blooms that a dear friend gave me. Thanks again, Mona!  This was very fun to do. I need a little more practice with the placement of the leaves.  It was difficult to take pictures of it closed. That's why I have the acrylic block against it.

Here you can see how it opens a little. I used a Cuttlebug swiss dots embossing folder on white and also green paper that I added to the sides. I have not decided if this will be a birthday card or ??? Will add a sentiment on the front and inside later.

Inks: 
Gina K sweet mango, jelly bean green and wild asparagus
distress rusty hinge, vintage photo

Thanks for visiting.
Peace and all good.

Wednesday, August 9, 2023

Stampfest at Lynette's August 8, 2023

We had a wonderful time at Lynette's place yesterday. She made lunch and dinner for us: home made crab salad and a tossed salad! I brought some zucchini bread and a bottle of Trader Joe's Espiral Vinho Verde Rosé. Afterward, we enjoyed a walk in the neighborhood and and stopped for ice cream cones. Then we worked on card making. We were very productive. Thanks to Lynette I now have a bunch of birthday cards ready to send out!

Just a reminder that you can always click on an image to view a larger version.

Our inspiration for our shell cards came from Janet a.k.a. swanlady21's blogpost called Wave.

Embossing folder: Cuttlebug D'vine Swirl
1-1/2 inch circle punch

Stamps: Michael Strong's Mini Cloisone Creatures, Stampendous Happy Birthday

Dies: Gina K Fluttering Fall layering bundle; Sizzix T.H. Alterations Wildflowers 6611808

Inks: Gina K blue raspberry, peach bellini, lucky clover, applemint
Inks on die cuts: Gina K apple mint and peach bellini

I forgot to add some color for "sand" before I attached the embossed layer. I used a blending brush then a blending stump to add some Gina K kraft ink.

I like how Lynette turned her embossed layer over because the back looks more like waves. She used a shell stamp from her stash, inking it with Gina K blue raspberry ink. She dabbed assorted colors on her die cut. She created the sandy area inside the circle opening by stamping with a tiny stamp from her stash.

We made some Sunflower cards with Stampin UP's Summer Sunflowers set from 2000! So glad I kept this set! 
Inks:
Gina K wild dandelion, jelly bean green, fresh asparagus,
Distress vintage photo

Our leaves cards were inspired by Beth Silaika's Fall Autumn Leaves card. If you visit her blog, it is the fourth card down.

Lynette figured out the placement of the leaves and I copied it! 

Stamps: 
Stampin' Up- Autumn Leaves, Itty Bitty Background
I think the Birthday Wishes sentiment stamp is from Stampin' Up. 
Not sure if the Autumn sentiment is from Hero Arts? 

Inks: 
Gina K Red Velvet
Distress Vintage photo and Antique Linen.

Thanks so much for visiting!
Peace and all good!

Saturday, July 29, 2023

Lady Faces July 2023

I'm at it again...artist "wanna-be"! This time I'm using my Jane Davenport Whimsical Girls book as my guide. This book was meant to be a workbook. The pages are made from and labeled with different kinds of paper: watercolor, marker paper, thin craft paper, coloring paper. There are a few pages of thin, colorful, collage paper that you can tear and use with acrylic medium for mixed media projects. For now, I am using this book for ideas on how to draw my lady faces. Not working on the actual pages of this book. Also, I just noticed that Jane has a YouTube on this book

For these faces, I used India Ink FABER-CASTELL Pitt Artist Pen, black, F (0.5 mm) and Canson watercolor paper, cold pressed 250 g/m2. When dry, I used Superior brand watercolors (set of 18 that my sister, Grace gave me). Also used my Jane Davenport  12 pan Bright Pallette watercolor set. Once dry, I added some ink blending to darken the colors: Gina K's sweet mango, wild dandelion, lucky clover and red velvet inks. Then I added some stamping around the edges.
This is the inside of the card.


For this second card, I used colored pencils to color the lady and ink blending for the border: Gina K's sweet mango, wild dandelion, lucky clover and passionate pink inks.
Here is the inside of that card.


I decided not to color the border of this card. Really liked the lady as she is. I wasn't sure which colors to use for the background...and was afraid to ruin what I had already done.
Here is the inside.


I wanted to try the "lined" hair that I saw in Jane's book. It was more difficult than it looked. Always seems that way! Jane has written text beside many of her drawings in the Whimsical Girls book. I decided to try it. I copied her way of creating the letters-fun to do. I wanted to make this girl's purple hair a little different so I blended some red with the purple on my pallette. Also I copied the blouse design from Jane's book.

I really enjoyed the process of drawing and painting. And it was fun to make the drawings into cards that I can send to friends.

Stamps: 
Stampin' Up-Letters from Friends
Heidi Grace/Fiskars-Dreamer
Heidi Grace/Fiskars-Cherrywood Ln.
Tim Holtz Mixed Media Collection Stampers Anonymous clear stamps/stencil set-THMM114
Dimensions Crafts-Thoughts of fancy stamps

Sentiment Stamps:
Penny Black-
  Friendships...2945H
  What matters...293CH
Hero Arts wood mounted set of 3 stamps-Nicest Thoughts
Stampendous-Treasured Friend
Stampabilities-Between Friends ER1034

Thanks for visiting!
Peace and all good!