Tuesday, December 17, 2024

Fun with Faux Postage Cards

You will see four faux postage cards below. The first one is cut from Lynette's Waffle Flower Postage Collage die. The other three are made with the old Just For Fun wood mounted stamp and stencil set.

For this card, I started with a faux postage layer made at Lynette's house on November 13. At home I stamped some postage stamps from Stampin Up onto white cardstock and fussy cut them. I placed one of them over my badly stamped leaf in the center of the panel. The Postcard "word" is from a Tim Holtz Stampers Anonymous clear stamp set called City Central CSS27911.

I was so happy to find my old Just For Fun brand wood mounted postage design rubber stamp and stencil from years ago! I used stamps from the sets shown in the photo above. Below is a close up of my Faux Postage card.

There are lots of faux postage samples on the Waffle Flower website and other blogs. For the design above, I was inspired by the colors of  Galina Filippenko's card with distress pumpkin ink blending at the bottom.

This card was inspired by Lisa of  My Card Trip. I stamped  then ink blended with the same ink in each of the rectangles. 

Gina K inks: bubblegum pink, light orchid
distress inks: lucky clover, fossilized amber
and Versafine onyx black

The card below has the same colors of ink blending as the first card, which was made at Lynette's house. See more details listed on the image. Click on this image or any image to see a larger view.


Thanks so much for visiting!
Peace and all good!

Thursday, November 14, 2024

Stampfest at Lynette's November 13, 2024

We visited Lynette Wednesday, November 13, 2024 and had a great day! For lunch, we took a walk to nearby Chipotle's for  Burrito Bowls.

Back at her house, she helped me decide on a simple Christmas card design.


Inside of my Christmas card

Then we had lots of fun playing with her new Waffle Flower Postage Collage Die, Waffle Flower Postage Collage Blocks Stencil (contains the "window openings"/rectangles to mask out the perforation areas and a little border AND the Waffle Flower Collage Wild Flower Stencil set (of 3 stencils) to add the flowers. 


We were impressed how easy it was for Lynette to die cut the faux postage layer in her Cuttlebug. The Postage Collage Wild Flower Stencils (set of 3 stencils) are etched with text on each showing the order to be used. Made it easy to add the ink with blending brushes.

Remember to click on any image for a larger version.
We used Gina K inks: wild dandelion, sweet mango, warm cocoa and grass green.

On our second postage collage, we ink blended 3 background colors to each of the rectangles. We used the Waffle Flower Postage Collage Blocks Stencil and we added paper to block each rectangle when the colors did not go across the blocks.  

Then we stamped various small image stamps from our collection using Versafine onyx black ink.


For the background ink blending, we used Gina K inks, starting at the bottom and working our way up...
bottom: jelly bean green 
middle: wild lilac 
top: light orchid.

When we were done stamping, Lynette taught Don and me to play Mexican Train Dominoes. It was a  lot of fun. We played a few rounds and I think we'll play again next time. 

Lynette always puts out a beautiful charcuterie board with some delicious wine and last night was no different! We enjoyed the food and listened to music and then showed her many pictures from our recent vacation. It was a lovely day!

Thanks for visiting!
Peace and all good!

Monday, October 7, 2024

Stampfest at Lynette's October 2, 2024

On Wednesday, October 2, Don and I visited Lynette. We had a great time having lunch together at Buona Beef, stamping and later visiting and relaxing!

Here's another view of our cards.

Lynette wanted to try a stencil technique that I have used to make sympathy cards. We used the Lattice section of the Tim Holtz Stencil called Flourish And Latticework Thmm115 and Stampin' Up's cameo coral ink with a blending brush.  We stamped Gina K's long flower from the Lisa Hetrick designed Hugs & Wildflowers stamp set using SU's lucky limeade and cameo coral inks. The card base is a  heavy weight creamy white cardstock from Hobby Lobby.


When Lynette showed me the butterfly and stenciled cards she made based on Natasha Foote's YouTube A 'Must Know' For Crafters!!! The Classic Split #1040 I wanted to make it too! So Lynette cut the butterflies with dies from Crafters Companion and I added stenciling and ink blending to the card using the Flourishes portion of the Tim Holtz Stencil Thmm115 with distress broken china and SU gable green inks. Also used a piece of waste canvas as a stencil. Lynette's work was the hard part, getting all those pieces removed from the die! 

We were both interested in making the Scribbly Bird cards posted on Anneke De Clerck's blog, Some Fiddling on the Kitchen Table. Below are 2 of Lynette's birdie layers, then 2 of mine:


We used Lynette's Caran D'ache watercolor crayons and a water brush on cold press watercolor paper--the smooth side. Used a heat tool to help dry the panel before stamping with Versafine onyx black ink and Dina Wakley's Scribbly bird stamps. We also stamped a separate bird image for layering as shown by Anneke, leaving the legs and feet of the image on the panel showing. We used a zig permanent pigment ink marker to hand draw leaves and circles and lines and a pink marker for groups of dashes, as Annke showed.  It was so relaxing to make these layers!

We also stamped some floral designed panels, using Gina K's Hugs & Wildflowers stamps designed by Lisa Hetrick. We duplicated the panels we made on our March 27, 2023 Stampfest. However we used Stampin' Up inks: lovely lilac ink for the flowers and old olive for the stems and leaves. We used an embossing stylus after inking the leaves to create the "line" in the center of each leaf.

After we finished stamping, Lynette served us an assortment of crackers with a Double Gloucester cheese with onion and chive, tortilla chips and salsa, a pumpkin spice caramel cluster candy, and Motif Cabernet Sauvignon Red Hills Lake County wine from Trader Joe's. We enjoyed watching some old music videos on YouTube on the TV. It was great fun visitng, stamping and relaxing!

Thank you for visiting!
Peace and all good!

Wednesday, August 21, 2024

Stampfest at Lynette's August 15, 2024

Don and I went to visit Lynette on Thursday, August 15, 2024. We enjoyed lunch at the Sugar Bowl restaurant...each of us ordered the Hobo Skillet. It was delicious! We all took home leftovers! 

After we were done stamping, Lynette served us her wonderful Seafood Salad, plus chips and salsa and Brie cheese and crackers and some Espiral Vinho Verde!

For our Stampfest inspiration, Lynette found an uncredited pin on Pinterest displaying a  sweet bird card made with one of Dina Wakley's Scribbly birds. I brought that set. Also brought Gina K's  Mandala stamp set and the Stampin' Up! Artistically Inked set-recently gifted to me by my dear friend, Mona.

Lynette made these Mandalas using Gina K's inks: Grass Green, Ocean Mist, Turquoise Sea, and Blue Raspberry. We followed Jennifer McGuire's Kaleidoscope Card YouTube.  

We both worked on these fun bird cards!  I stamped the Dina Wakley Scribbly bird twice on old music paper with Versafine Onyx Black ink. Lynette fussy cut them. 

We stamped the white card base with a stamp called Woven Linen by All Night Media #408K using SU's bordering blue ink. Then I added various Gina K ink colors with blending brushes to the card base: Powder Blue, Turquoise Sea, Wild Dandelion and Kraft.

We tore a strip of old book paper as shown and used Gina K Kraft ink on the edges. We made the ruler strip with an embossing folder, trimming to fit. Lynette punched the hearts from red cardstock. We used a Stampendous clear set #SSC039 Window Box for the happy birthday sentiment. We stamped it in Versafine Onyx Black ink.  

With the Stampin' Up! Artistically Inked stamp set, we followed Jackie Bolhuis' YouTube tutorial.  Thanks to Mona for the stamps and for sharing Jackie's One Card Wonder tutorial. This technique makes it so easy to create 4 card fronts at once using 8-1/2" by 11" cardstock. I had already tried this technique when I received these stamps from Mona. If you want to see my samples go to my Artistically Inked cards here

As usual, we had a great day visiting and stamping! 

Thank you for visiting!
Peace and all good!

Tuesday, August 20, 2024

Gina K's Mandala Maker Stamp set from Mona

My dear friend, Mona, recently sent me a package of stamping goodies including but not limited to Gina K's original Mandala Maker stamp set and Fancy Phrases stamps and dies.

I used Gina K's original Wreath Builder stencils, both the 3-3/4" and 4" versions. You can see in the photos, the 4" wreath builder extends almost to the edge of a regular 4-1/4" by 5-1/4" card.

I also followed Jennifer McGuire's Kaleidoscope Cards YouTube as I worked. She was very helpful in deciding which stamps to use! I followed her blue and green color scheme at first to get me started. It was very relaxing to make these mandala cards.

I added notes to my image for future reference. I marked the center of my card by taking the ruler and matching opposite corners. I stamped twice for most of the images to get good color coverage. 

I used all of Gina K's aqua/turquoise inks in this mandala...from the center outward: Sea Glass, Ocean Mist, Turquoise Sea, Blue Lagoon, Tranquil Teal. I had already stamped and die cut the Gina K Fancy Phrases Happy Birthday sentiment (Thank You Mona!!). Maybe I should have stamped it in Tranquil Teal instead of Versafine Onyx Black ink? I added Gina K Disco Balls sequins on some of my cards.

I'm glad I marked the ink colors used on this one...Gina K's Light Orchid, Sea Glass, Lovely Lavender and Medium Orchid as shown. I probably would not have remembered them!

Thanks for visiting!
Peace and all good!

Artistically Inked Stamp Set from Mona


My dear friend, Mona, recently sent me a package of stamping goodies including, but not limited to the  Stampin' Up! Artistically Inked stamp set. Plus, she sent me a beautiful card made from SU's Artistically Inked stamp set, following Jackie Bolhuis' YouTube tutorial. Jackie's method is similar to the old One Sheet Wonder technique, but she mindfully stamps to create 4 beautiful cards. Her technique was very quick and easy and fun!

I took a photo of my attempt, putting my inkpads in the picture so I'd remember what colors I used. I found it very helpful to follow Jackie's YouTube while I stamped on the entire sheet of cardstock.


I copied Mona's method of stamping the envelopes. This Artistically Inked stamp set was perfect for this technique and so much fun. 

I will created another blogpost for the Gina K Mandala Maker-original set.

Thanks for visiting!
Peace and all good!

Sunday, July 14, 2024

Stampfest at Lynette's July 10, 2024

Lynette, Don and I spent the day together on Wednesday, July 10, 2024. We walked to Pita, Pita, a new restaurant nearby and  had a delicious lunch. Then Lynette and I spent several hours stamping. We always have a great time together!

Here are the cards we made. Remember, you can click on any image and see a larger version. 

Our inspiration came from cards made by members of the Gina K Designs & StampTV Friends Facebook Group.

The sailboat and map card was inspired by one of Sheri West Harris' beautiful series of cards. The boat and birds are from Gina K's Time to Coast stamp set. The map background stamp is from Lynette's stash. Tag die from her stash too.

Inks: 
Versafine onyx black
Gina K's ocean mist, sea glass and powder blue blended on the map background; tranquil teal for the sailboat and birds.


This beach scene card was inspired by Tracy Renner's beautiful beach cards. We tore an oval in a 4 x 5-1/4 inch piece of printer paper to mask the scene. Then used a  cardstock to mask the sky, the sea and the sand, using blending brushes to add Gina K inks...
turquoise sea for the sea
sandy beach for the sand
and
ocean mist for the clouds, using Gina's method of torn paper for the clouds.

We used some stamps from Lynette's stash:
Waves using Gina's turquoise sea ink
Seagrasss from Stampscapes using black ink
Sand Hill stamp which we stamped in sandy beach, giving the sand some texture. Then we added texture with a dotted stamp with vintage photo or tea dye ink.

The rocks in the background were stamped with Lynette's Stampin' Up!'s Waterfront set in Versafine onyx black ink. We drew black lines at the horizon and black lines in the sand adding bits of "seagrass" here and there and some hills. We also drew the birds in freehand. Later we noticed that Gina's Time to Coast stamp set had a similar bird stamp!

This sea card was inspired by Debra Ringler-Couch's beautiful card. We punched a circle from cardstock (a scant 2" in diameter). Placed that down first, with a little washi tape on the back-press the washi tape on cloth a few times to make it less sticky. Then we added another mask to block out the sky so we could add color to the sea. We used Gina K's powder blue with a blending brush. Then we covered the sea and added wild dandelion yellow ink with a blending brush as shown. 

We stamped the boat after removing the masks. But we should have added a little bit of blue to the sea part of the circle, masking the sky before stamping the boat. 

We stamped the boat, the rocks , the birds and the sentiment (mine) with Versafine onyx black ink. Then we added the lines for waves and at the horizon with a fine point black marker. 

We had a great time making cards and visiting! We always do!

Thanks for visiting!
Peace and all good!

Thursday, May 9, 2024

Stampfest at Lynette's May 7, 2024

Lynette and I had a wonderful time stamping on Tuesday, May 7, 2024. We had lots of inspiration from cards we saw online. Thanks to those who share their artwork!  

Our "torn book and ledger" card was fun to make. Inspired by Natasha Foote's YouTube #991...and a card posted by a member of Natasha's Facebook group. It's called Come crafting with Natasha. Thank you to Natasha and the FB member for sharing their artistic talent!

I worked on the background pieces, stamping with a Hero Arts ledger stamp, using an old book page,  tearing and sponging distress gathered twigs ink on the edges of both.  I found a piece of darker brown cardstock that was already stamped with a tiny script. I trimmed it to fit the card and  added flourishes from Stampin' Up's Carte Postal, using Brilliance white ink. 

Lynette worked on the flowers and leaves, stamping Stampin' Up's Secret Garden flowers in versafine black onyx onto a soft buttercream linen cardstock. Then she did some ink blending with distress lemonade and honey to add more color. The leaves were stamped in Gina K's jelly bean green.


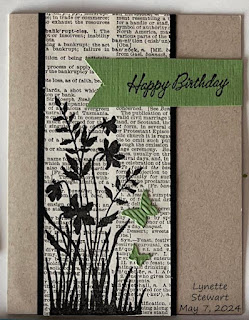
Inspired by a card Lynette found online created by Scrappin' and Stampin' in GJ. Scroll down-the card is toward the bottom of that webpage.

We cut book paper, 2-3/8 wide by 5-1/2 long. And added a piece of black card stock to back it. 
We used the silhouette stamp in Stampin' Up's Just Believe set. 
The green butterflies were die cut from a  Stampin Up's Embosslit called Beautiful Wings
We cut our own banner and stamped with sentiments.

We used Versafine Onyx Black ink.


We really like the big dragonfly blueprints image from Tim Holtz's old Stampers Anonymous Classic Favorites "Classics #1 SCF001" cling rubber stamp. We created a stenciled background with
Tim Holtz Collection Dot Fades THS006
Circles and X's aka Dotted and stitched-THMM114
Harlequin THS016
TH Mesh & Typo stencil from TH Mixed-Media Stamps & Stencil set THMM121.
Then stamped the dragonfly with Versafine onyx black ink.

Inks used to blend over the stencils: distress broken china, wild honey, peeled paint.


Had so much fun with the stenciled background and the large dragonfly that we made a second, portrait version, which was inspired by Rita Wright's Masked Butterfly card

Stencils: Tim Holtz circles THMM114 and sequin waste stencil

Inks: Gina K sea glass and jelly bean green 
Stamped the dragonfly with Versafine onyx black.


We were inspired to make these watercolor flowers after seeing Amy Williams' YouTube: Water coloring made EASY! We used Jane Davenport's set of 12 watercolors-brights pallette. I had already played with this technique using reinkers, which you can see here. We used water brushes. However, next time I would like to try using a paintbrush.
 
Below are close ups. Click on an image to see a larger version.


Here you see Gina K's 4 x 4 inch Happy Hydrangea stamped image from using Lynette's luxurious Caran D'Asche watercolor crayons. 

I have to tell you about the right layer. We spritzed the stamp first then added the watercolor crayons and spritzed it before stamping. That image was too watery. We then worked on the left panel, in which we did NOT give it the 2nd spritz of water after coloring the stamp with the watercolor crayons.  That came out better!

We decided to give the right panel another chance...spritzed the stamp and added watercolor crayon (2nd time)...but this time we DID NOT SPRITZ the stamp a second time. Lynette stamped the hydrangea right on top of the stamped image and I think it looks great now!

I hope that the descriptions make sense. It can be handy for us to look back and see what we did to create these cards and panels.

Thank you for visiting.
Peace and all good.