Sunday, December 23, 2018

Sewing for my Grandchildren

I have been sewing some last minute Christmas gifts for my grandchildren.
 Here are some doll clothes that are supposed to fit a Bitty Baby doll.
I have used 3 free patterns from ReadCreations. Instructions for this sleeper can be found HERE. I changed the pattern a little by adding sleeves (drew my own based on the armscye/armhole on the pattern). Also, I added a strip of cotton interlock knit for the neckline trim. Since Vivian likes Olaf, I used a woven Olaf fabric from JoAnn's. 

Read Creations has a free pattern tutorial for a shirt and pants. I liked how the white knit sleeves looked on the sleeper, so I used knit fabric for the sleeves of the top. 

Before sewing the interlock knit cotton strip to the neckline, I serged the back opening of the shirt, then pressed 1/4 inch under. On the white interlock knit strip for the neckline, I finished the ends by sewed the ends, then turned right side out. Placed the nice finished end at the folded edge of the back.  Sewed the white knit strip to the neckline, then serged over that for a nice finish. I serged over all the seams in this way. Instead of putting a long strip of velcro to close the back, I added 2 narrow pieces, one at the top, the other at the bottom. My strip of interlock knit at the bottom of the shirt was a bit too long, so I just matched my trim to the shirt and cut off the excess. Here again, I finished the ends of the trim before sewing it on the bottom of the shirt.

I'm hoping these doll clothes fit Vivian's Bitty Baby. There are a few more items that I would like to try to make...the diaper, the hat and maybe the button down the front sleeper.

I made this small pillow and pillowcase for Vivian. The pillow measures about 16 x 14 inches. I used white cotton fabric and stuffed it with polyester fiberfill. The Olaf fabric pillowcase measures about 19-1/4 x 16 inches.

Used a firemen print fabric for 2 pillowcases for Gavin. I love the Made Everyday by Dana tutorial.
I usually try to preshrink the fabric. 

Here is Alex's pillowcase, folded in half. Since he is not using a pillow, I just made him one pillowcase. If he wants a smaller pillow like Vivian's, I can make that for him.

I have thoroughly enjoyed sewing for my Grandkids!
I hope they enjoy these items!

Wishing you a very Merry Christmas if you celebrate
and a Happy Holidays!
With love!

Wednesday, December 19, 2018

Two More Christmas Cards

A few more cards are getting mailed...
Still using my large stash of Christmas papers
and Tim Holtz stamps with festive berries distress ink.

Love the look that old crimper gives on this holly paper.
Added a strip of  "red line tape" to attach the green ribbon, making loops here and there.
Thanks for visiting!
Hoping you are enjoying the season of Hope and Love!

Monday, December 17, 2018

Christmas Cards

I started working on making Christmas cards after Thanksgiving.
Was hoping to be on top of this, but the cards are still here...
Hopefully to be mailed tonight!

Stil using printed papers from my stash.
Stamps from Michael Strong, Hampton Arts, Tim Holtz and Stampin' Up!

Below are some close-ups:


Thanks so much for visiting.
May your day be merry!

Saturday, December 15, 2018

Stampfest with Lynette Dec 5, 2018

Lynette and I spent the day on December 5th visiting and stamping.
We used some printed Christmas papers from my stash.
Lynette brought along a Tim Holtz stamp and die set from awhile ago.
I pulled out some of my Tim Holtz Christmas stamps and my Michael Strong Christmas tree.


It's fun to see all the bits and pieces and parts of the cards before they are done!

Thanks for visiting! Wishing you JOY!

Sunday, December 2, 2018

Fleece Lining for Crocheted Hat

Thanks to Christina Ramirez of Love Stitch Love for her tutorial on how to add a fleece lining to a crocheted hat. I am blogging some photos I made to remember this process.


As Christina suggested, I made a pattern from the crocheted hat, which was folded into quarters first.

Using a 1/2 inch seam allowance, sew 2 of the pieces together twice.
This gives you 2 halves. 
Then sew those 2 halves together creating the hat lining.
I marked the half way points on both the fleece and the crocheted hat. 
Then it was easy to line them up and pin together.
Put the fleece hat inside the crocheted hat, matching the sides.
Place the fleece earflap pieces so they match the crocheted earflaps.
Leave about 1/2 inch unsewn on either side of the earflaps when sewing them to hat.
Then you can fold that part underneath for a finished edge.

Pin the hem under on fleece earflap and all along fleece lining.
I machine topstitched that part of the earflap to make it stay in place.

Hand sew the fleece lining to crocheted hat using small stitches.
Stretch out the hat now and then so thread will not break with the normal use.
On an earlier attempt, I machine stitched the fleece lining to the crocheted hat, 
but I found it much easier to sew it by hand.

Thanks Christina for your great tutorial! 

Friday, November 30, 2018

Sewing Aprons for the Little Ones

After seeing a wonderful kids apron pattern by Beth Galvin at Craftsy I decided to make aprons for our three grandchidren and a friend's two children.  I have lots of fabric in my stash, and these aprons only take 1/2 yard, so I grabbed some fabric and went to work on these little surprise Christmas gifts. 

Here is the front of Vivian's apron. I like how Beth keeps it simple with a waist strap that secures with Velcro (hook and loop closure). Making the apron reversible is an easy way to finish the edges!

Here is the reverse side of Vivian's apron. The pattern size that Beth shared is for a 3 to 6 year old. Since Vivian is not quite 2, I reduced the dimensions of Beth's pattern. Used this size for Alex and Lucy who are both under 2 years old.
I made myself a pattern for the smaller size, which is
about 2 inches shorter
and about 1.5 inches narrower.
Used 14.5 inches of 3/4" elastic instead of 15 inches for the neck strap.

Here is the front of Alex's apron. He's 18 months old.

Here is the reverse of Alex's apron.

Here is Lucy's apron. She's almost 18 months old.

Here is Gavin's apron, made according to Beth's pattern here.

Here is Henry's  apron also made according to Beth's pattern.

I am going to see our grandchildren next week. I think these will be early Christmas gifts for them. I can't wait!

Thanks for visiting! I hope you are enjoying this season of love and giving.

Saturday, September 29, 2018

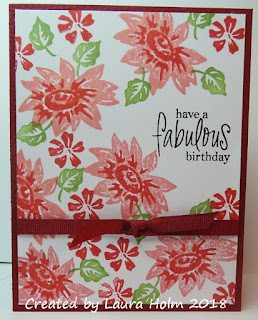
Red Sunflowers

Today's red sunflowers are a result of the sweet comment that Carol Reed left on my blog yesterday.
She encouraged me to experiment with non-traditional colors. You can see Carol's cool sunflowers on her blog: Stampin With Carol Reed.
Materials used:
Stamps-Stampin' Up, Fiskars
Inks-distress worn lipstick, festive berries, Stampin' Up wild wasabi, Versafine onyx black
Red grosgrain ribbon

Stamps: Stampin' Up, Hero Arts


Stamp: Hero Arts

Thanks for visiting! Hope you are having a fun and relaxing weekend!

Friday, September 28, 2018

Blue Sunflower Mini Stampfest with Lynette

Lynette and I found a little time to stamp together on Wednesday, September 26. This is Lynette's card. Our inspiration came from Carol Read's blue sunflower card: Stampin With Carol Read. We used the smaller sunflower from the 2000 Stampin' Up Summer Sunflower Definitely Decorative set. The circles were made from Lynette's Stampin' Up's circle dies-I think they are called Stitched Shapes Framelits.

My card is lacking some blue! Wish I had added more sunflowers!  I really like how Lynette's card pops with all the blue! Lynette found the perfect ink colors for the two step stamping of the sunflowers: ballet blue and limeade from Stampin' Up and ultramarine from Vivid.

I made this card front at Lynette's and finished it at home.
The birthday wishes stamp is from Hero Arts.

Made this card today, trying to fit in more flowers like Lynette's card.
I had to make do with my inks: Stampin' Up's brilliant blue and old olive instead of Lynette's Vivid ultramarine and SU limeade.
I added a grosgrain ribbon and a paper "banner".
Sentiment from Fiskars.

Here is  look inside my card. Sentiment stamp by PSX.

Wanted to remember the evening at Lynette's so took a photo of the charcuterie we enjoyed with our husbands while watching some travel shows on TV.

Thank you for visiting! Hoping you have a fun week end!

Saturday, September 22, 2018

Scraps into a Birthday Card

My stamping desk is a big mess with scraps and stamps. I couldn't part with this distress background piece. When I found this green cardstock to match, it was very fun to make this card. I'm still on a roll with Stampin' Up's What I Love set, which is also sitting with the mess on my desk.

Used Distress Oxides peacock feathers and broken china. The distress oxides are so much darker and thicker than the regular distress inks. I stamped off on some of the fill-in, more solid flower stamps. Sometimes the ink coverage was uneven, so then I didn't stamp off.  I wanted to let some of the paper show through. 
The Happy Birthday was from an old Stampin' Up sentiment set called God's Blessings.

Thanks for visiting. Hope you are having a GREAT week end!

Thursday, September 20, 2018

Guy Birthday Cards

Sometimes I find it difficult to come up with ideas for guy birthday cards. However after seeing this PIN of a train/map card by Kim Smith of Crafting Buddy, I was inspired.

Stamps: Stampin Up 1997 Happy Birthday, 1998 Old World Map, Raindrops on Roses boat stamp

Inks: distress scattered straw, shabby shutters, spiced marmalade
Stampin Up certainly celery
Versafine onyx black

This card is the same layout at above, except for ink colors: distress salty ocean, dried marigold, barn door, early espresso

Here I've switched from a boat to Mr. Umbrella Man from Tim Holtz-a Visual Artistry Collection called Life's Possibilities CSS25870 clear stamps.
Happy Birthday stamp from StampCraft.
Inks: distress walnut stain, salty ocean, scattered straw

Here are color variations: distress broken china, dried marigold, spiced marmalade.

Thanks so much for visiting! 
Wishing you a day filled with happy thoughts and special JOY!

Thursday, September 13, 2018

Flower Cards

If you know me, you know that there isn't a flower stamp that I don't like! I love them all! This mini flower is an old Michael Strong stamp of mine. It's just the right size and very fun to play with!

The card base for both of my cards is a "flecked off white" cardstock. The green layer was dry embossed with Sizzix Retro Circles embossing folder. I dislike the way this folder embosses-it always tears the paper in some places. I tried Frenchie's tip about putting a piece of vellum in the folder with the cardstock, but I still had some cracking of the cardstock.

Used distress dried marigold ink for the flowers and Stampin' Up certainly celery ink for the tiny leaves--leaf stamp from an old favorite SU set called Hand-Painted Petites.

Inside of card. You can always click my images for a larger view.

Same design, just changed the colors...distress worn lipstick ink for the flowers and Stampin' Up wild wasabi ink for the leaves--leaf stamp from a new favorite SU set called Lots of Lavender.

Both cards have Hero Arts plastic sequins attached with acrylic medium.
Inside of card
Stamps-outside Happy Birthday from Stampabilities
inside sentiment from PSX

Stamping is so relaxing for me. I hope you do something that relaxes you and bring peace into your life.